• Oil Painting Gallery
  • Blog
  • The Artistic Process
  • About
Menu

Irish Surrealist Paintings by Leanne Rath

  • Oil Painting Gallery
  • Blog
  • The Artistic Process
  • About

Oil on Canvas: Oil Painting Techniques for Beginners

January 28, 2019

Do you find all of the knowledge out there about oil painting a bit intimidating? It can be hard to know where to start, especially when there's so many different techniques and methods of painting. When I started out I had no idea what I was doing, and was fairly aimless in my approach to painting. Once I found my feet, however, I was flying, and once you learn about the basic techniques, you will be too!


The Fat Over Lean Rule

Just in case you haven't heard this very important note already; when painting with mediums, always paint with your faster drying mediums first (or less of your slow drying medium), and transition to more fatty, slow drying mediums to avoid the paint cracking. For example, if you're painting with linseed oil, use less linseed oil in the paints of earlier layers, and add a little more for each consecutive layer. Or, if you're using different mediums, such as liquin and linseed oil, go from the fastest drying to the slowest drying; in this case it would be liquin, then linseed oil. This is why it's a good idea to use a fast drying medium for underpaintings if you're doing one, such as Gamblin's galkyd gel.

fat over lean rule paint brush


Oil Painting “Alla Prima”

Alla prima, also known as wet-on-wet or direct painting, is when you apply wet paint- you guessed it- directly onto wet paint. This method is best for if you want a fast approach to painting, without having to wait for drying times, and you can get some nice effects and blending techniques from it. For blending a flawless gradient with wet paints, I strongly reccomend a goat's mop brush; the soft bristles and rounded shape make this brush excellent for seamless color transitions. The good thing about direct painting is that you don't have to concern yourself with the fat over lean rule if it's all painted in one layer.

oil painting alla prima


Underpainting and Colored Grounds

An underpainting is a great aid for your overall painting; it helps to inform you of shadows, highlights and structure. Basically, you choose one color to paint the rough shapes, shadows and highlights of your subject, and you can then use this as a guide for your painting. Better still, the shadows and highlights can shine through if your paint is a bit thinned out, and you can use that as a natural looking shadow in itself. It's a good idea to do this on a coloured ground/base (the same color you want to do the underpainting with, thinned out and rubbed into the canvas so it's a bit lighter than the paint itself) as it looks more natural, and you can easily rub away mistakes with a rag. I personally still use a white ground, with a blue underpainting; it's harder to fix mistakes but it makes the paintings really glow!

colored grounds for oil painting


Using a Grisaille 

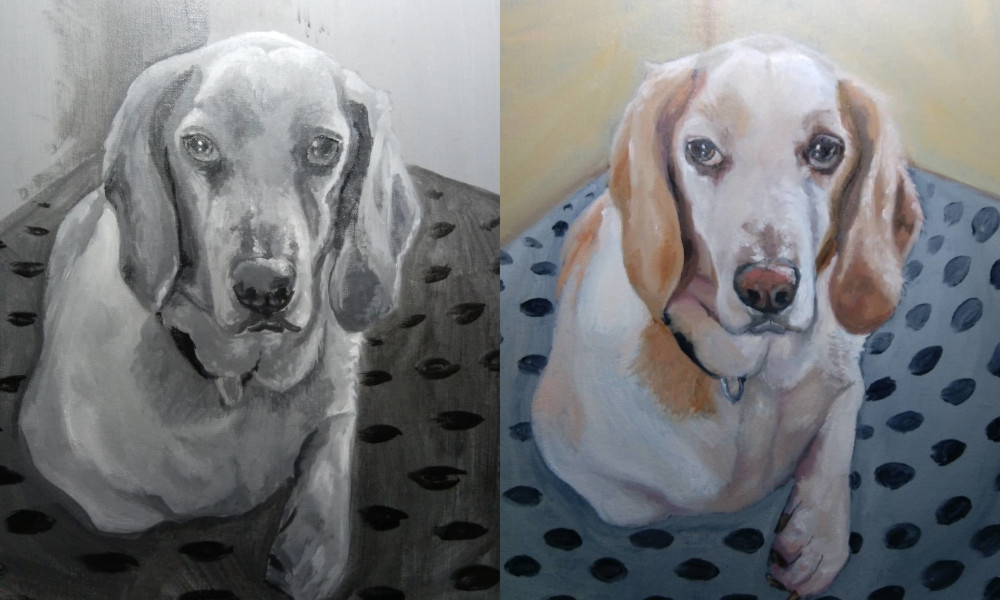
A grisaille is a monochrome painting, often black and white but you can also tint this to have a slightly burnt umber hue. They make for brilliant underpaintings, as you can wash thinner layers of color over them to let the natural shadows and highlights shine out, and paint details over them. The painting below was done using a very basic acrylic grisaille (for quicker drying times, although you can use oil paints for this also. I suggest using either Liquin or Gamblin's Galkyd mediums for quicker drying times) and thin layers of paint on top.

grisaille painting before and after with oils and acrylics


Color Theory Trick for Shadows

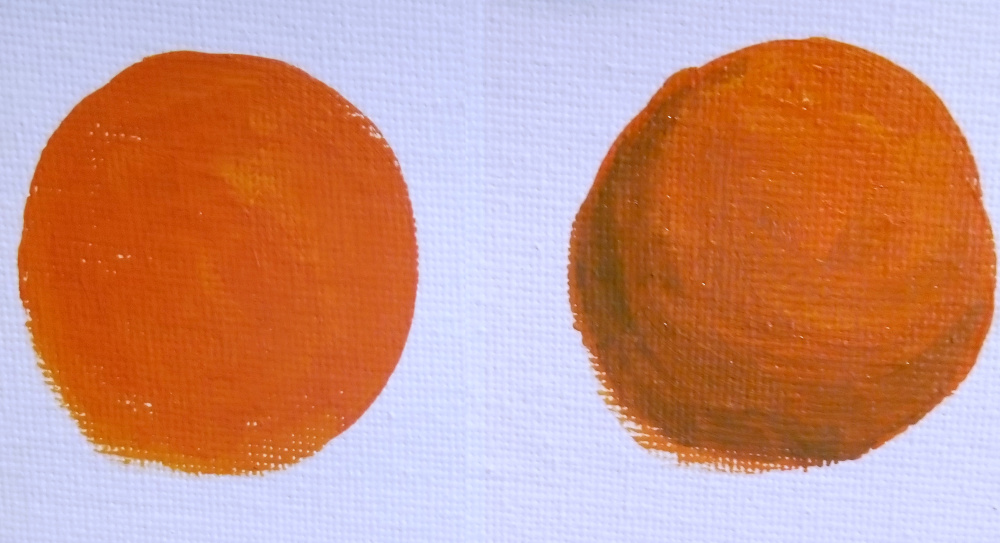
If you're new to color theory, you might not have heard of this little gem of a fact; if you mix a color with its complimentary (or the color at the opposite end of the color wheel), you get a natural looking shadow for that color. For example, on the second orange circle below, I mixed some blue and orange (and even put some straight blue into the wet orange paint!) and it comes out looking like a natural shadow!

mixing complimentary colors to form shadows


Try painting impasto with a palette knife

When you're starting out, it's good to try all sorts of things to get to know what you enjoy. Try doing some impasto (thick paint) painting, and see how you enjoy it! If you want the paint to dry faster after using this painting technique, try using Liquin impasto or Gamblin's Galkyd gel as your medium!

impasto oil painting technique


Basic color mixing in Oil Painting

Mixing out your colors with a palette knife beforehand is incredibly helpful, as it saves your brushes a lot of wear and tear and helps you to get accurate colors in your painting. Reference your subject by putting the palette knife with the color on it at the same eye level as your subject; if the color is looking a bit too bright and you want a duller shade, add some complimentary to it. Try to look for different tones in your colors; ask yourself questions such as, is it really just a blue, or is it a slightly reddish blue? If you're worried about which colors you might need, start off with an ultramarine blue, yellow lake, scarlet lake, burnt umber, yellow ochre, titanium white, cerulean blue (or manganese blue hue from Windsor and Newton if you're looking for a much cheaper artist's grade version; I frequently substitute it for cerulean and notice little difference), and permanent alizarin crimson. This palette is fairly unlimited; the only thing I have extreme trouble mixing is a rich magenta, which is near impossible; so if you're planning on painting with magenta a lot, I recommend getting a tube of quinacridone magenta also. Try using less paint than you think you'll need when squeezing onto your palette; I use a small pea-sized amount of paint of each color (with the exception of titanium white, which I'd squeeze out a bigger bit of) to start with.
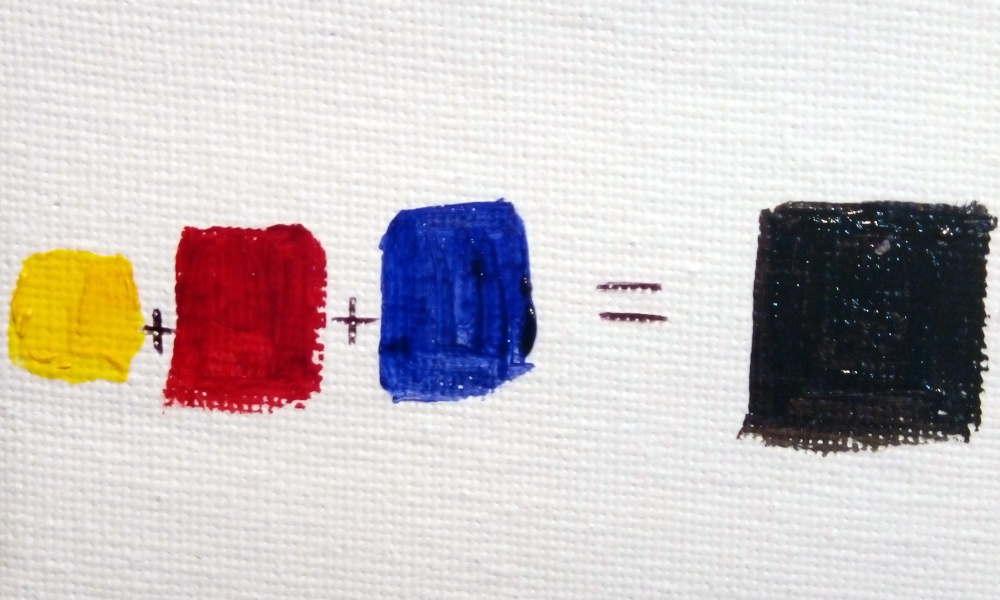
color wheel painted in oil paint

Mix your own black

Fun fact; you can mix black out of colors! Mix a bit of alizarin crimson with ultramarine blue to get a really dark (almost black) purple, then add some yellow to make it a true black! Adding linseed oil can deepen the richness of this black, as can layering it up. Check out how it looks below!

oil paint color mixing to create black


Oil paint is a wonderfully versatile medium, and whether you want to paint wild abstract landscapes or hyper realistic portraits, it lets you do exactly what you want (presuming you know how!). Play around with the medium and see what suits you best; you might think you want to paint in thick impasto, but maybe you actually enjoy the effects that carefully planned thin layers of paint gives you more!

What technique are you excited to try using, and why? 


Tags oil painting, oil painting tutorials, tutorials, blogs, oil painting on canvas techniques
how to read more books if short on time banner.png

How to Read more Books (Even if you're Short on Time!)

November 26, 2018

I love reading, but sometimes it's really hard to fit in the time to read, especially with the constant distractions of technology. I tend to go on 'book binges', where I'll read five or so books in a row, followed by reading nothing for the next year or so. Recently, however, as I've counted it as an important habit, I've found some easy ways to fit reading into my lifestyle, and embraced the use of technology in doing so. Here are a few tips on how to fit more pages into your day!

Listen to Audiobooks for less Tired eyes

Reading books before going to sleep is not only a good way to help you read more, but also makes getting to sleep just that bit easier! Personally, I find it pretty hard to read books by the end of the day, as it's a pretty big strain on tired eyes, especially if you're at a computer all day. I've recently gotten into the habit of listening to audiobooks just before bed. The Audible app thankfully has a timer setting, so that you can set it to stop a set amount of time from when you start listening automatically, so I don't even have to pause it before I go to sleep, which is pretty rad!

Read Kindle books from Anywhere

For a while, I was stuck in a pretty brain-dead call centre job where the biggest dilemma was trying to figure out what to do with my free time. As soon as I figured out that there was a kindle reader for the internet browser, I was set to go. The good thing about Kindle books is you don't need a kindle reader or even a tablet; you can get the app for your smartphone even and continue reading from any other device connected to the same account. As someone who forever has had to reread pages of books to figure out where I last picked it up, this proved itself pretty handy.

Audiobooks for Multitasking

Whenever I'm painting or drawing I'm either listening to music or an audiobook. There are loads of different activities that you could combine audiobooks with that would prove a major pain to try to combine a traditional book with, such as household chores, cooking, walking and so on. Audiobooks are perfect for multitasking so if you've got a busy lifestyle they're bound to prove useful.

Small, inspiring books for quick, inspiring reads

If you're going to bring books with you for when you have a free moment, it's easier to bring around smaller books that pack a punch than large books that often take a lot of time investment. Choose books that you can pick up for five minutes and really get something out of, and preferably in a size that fits your bag of choice!

Don't force yourself to read books you're not enjoying.

Just move on to another book. You might even come back to the not so enjoyable ones at a later time and find that they're actually not bad. But there's no point in wasting time on books you aren't into; life is too short! If you have a tendency to start books and leave them aside, I'd recommend a service such as Scribd, which is a monthly payment for all of the books in their library (including some audiobooks, too!), rather than potentially wasting your money on books you can't sink yourself into.

Reading can be great to build on knowledge, and even our way of thinking in our day to day life; and the more we read, the more well rounded we are as both people and creatives. I hope you find these tips helpful for getting through all those books on your 'to read' list... Happy reading!

Tags reading, books, life hacks, blogs, audiobooks
1 Comment
Untitled design (1).png

Art Studio Hacks for Small Spaces

October 15, 2018

It can be hard to find space to create sometimes, especially if you live in a small space. However, if creating is an important endeavour to you, whether you're an aspiring artist or simply a passionate hobbyist, working with your space is a must, so here's some hacks I've developed over the past year of working from a tiny space.


A Sketch Easel is great for portability and storage

If you're stuck for space but still want the ease of an easel, a sketch easel is perfect; just fold it up and put it away when you're done! Sketch easels are intended for portability, so they're also great for saving storage space when they're not in use. Alternatively, if you have a desk, you can use a desktop easel, many of which have built in storage such as this one.

This small trolley is great for moving around art supplies and a small desktop easel!

This small trolley is great for moving around art supplies and a small desktop easel!


Have an "Art Cart" for both storage and drying

Having a small trolley, depending on the size of your space, can be handy for not only organising your supplies, but also for drying your paintings. Simply lay smaller paintings over the shelves, and you can dry several paintings at once. If you want to bring it a step further, simply put a desktop easel on the top shelf, and voila: you've got yourself an all-in-one art studio.

Keep your art supplies organised with beautiful containers!

Keep your art supplies organised with beautiful containers!

Use old instant coffee containers to stay organised

Staying organised is a must if you only have a small space, and using old containers is a cheap (and sometimes funky!) alternative to buying storage accessories. I personally use these Nescafe Azera containers, because they're perfect for holding brushes, turps, water, or whatever you might need, plus they come in beautiful designs and I'm addicted to the coffee!


Take the time to tidy your space 

This is probably the most important one on this list; even if you organise a beautiful tiny art studio, if you don't tidy it regularly, it can turn into an absolute mess. I'd recommend doing a small tidy after every session or so, to keep everything as neat as it can be.


Make sure everything has its place

If you're struggling to find things in your studio, perhaps it's time to rethink your setup! Organise things in such a way so that everything has its own space. This can be a fun process; don't be afraid to use sticky notes, stickers, labels, and get creative. Just make sure it's easy to tell where everything goes!


Use a storage box as a handy table

A cheap storage box with a lid doubles up brilliantly as a table; you can use this to keep your palette, brushes and whatever else you need on, and store things you won't need as you're painting inside, such as extra canvases, sketch pads, and so on.

Brush rolls are a beautiful and convenient way to keep your favourites handy!

Brush rolls are a beautiful and convenient way to keep your favourites handy!

Use a brush roll to keep your most-used beauties handy

If you're not a fan of keeping your brushes in old containers and would rather a more portable alternative, brush rolls are your best bet. They're convenient, can hold a variety of supplies should you need it (including palette knives!) and also they're pretty beautiful. It's lovely to open up the roll and see your favourite brushes laying there, just waiting to be used.

Although organising a space for your creative process can be difficult, it's incredibly fulfilling and time saving once you have; not having to dig out the paints from packed drawers and find a spot to paint makes making art hassle free. I hope it helps your creative juices flow! 

In art hacks Tags art studio, painting, art hacks, small art studio, blogs, artist advice
6 Comments

past blogs

  • 2019
    • Nov 18, 2019 A Guide to Painting Your Feelings
    • Oct 14, 2019 Self Learning
    • Sep 23, 2019 Mindscapes: What are they?
    • May 8, 2019 Why You Shouldn't Wait to Create Your Own Art
    • Apr 30, 2019 Painting ideas: 6 painting ideas to improve your art
    • Apr 22, 2019 Oil Painting vs Watercolor: Which is Best for Beginners?
    • Apr 15, 2019 Oil Painting at Home: Everything you Need to Know
    • Feb 4, 2019 Oil Painting Mediums: The Complete Guide to Drying Times
    • Jan 28, 2019 Oil on Canvas: Oil Painting Techniques for Beginners
  • 2018
    • Nov 26, 2018 How to Read more Books (Even if you're Short on Time!)
    • Nov 19, 2018 How to Clean your Oil Painting Brushes without Turpentine (For Cheap!)
    • Oct 15, 2018 Art Studio Hacks for Small Spaces

Powered by Squarespace